You nursed that beer for two weeks. You checked the airlock more often than your phone. And now comes the step where more good homebrew gets ruined than anywhere else in the process: getting bubbles into the bottle.
Bottle conditioning is the oldest carbonation method there is — and when you do it right, it's still one of the best. Westmalle does it. Orval does it. Your grandfather's pilsner probably did it. The yeast carbonates the beer inside the sealed bottle, the carbonation comes out fine and creamy, and the beer keeps evolving for months. No CO2 tank, no kegerator, no excuses.
Done wrong, you get flat beer, gushers, or — worst case — glass grenades in your cupboard. The difference between the two outcomes is one number and a little patience. Let's get both right.
What bottle conditioning actually is
When fermentation ends, there's still live yeast in your beer — millions of cells in suspension, out of sugar and out of work. Bottle conditioning gives them one last, carefully measured meal: you add a known amount of priming sugar, seal the bottle, and the yeast ferments it. The CO2 has nowhere to go, so it dissolves into the beer. Two to three weeks later: carbonated beer, naturally.
Because the carbonation builds slowly under pressure, the bubbles are finer than force-carbonated beer — that dense Belgian mousse doesn't come from a tank. And the active yeast scavenges oxygen from the headspace, which is why bottle-conditioned beer often stays fresh longer than filtered, force-carbonated beer in the same cellar.
The only number that matters: CO2 volumes
Carbonation is measured in "volumes of CO2" — how many litres of gas are dissolved per litre of beer. Your finished, uncarbonated beer already holds roughly 0.8–0.9 volumes left over from fermentation at ale temperatures. The priming sugar covers the gap to your target:
- British ales, bitters, stouts: 1.5–2.2 volumes — soft, pub-style
- Pale ales, IPAs, ambers: 2.2–2.6 volumes — the standard range
- Lagers and pilsners: 2.4–2.7 volumes
- Belgian dubbels, tripels, quads: 2.8–3.5 volumes — this is where the character lives
- Wheat beers: 3.3 volumes and up — only in bottles built for it
Overshoot the target and you get gushers. Overshoot it badly in thin glass and you get shrapnel. Everything below follows from this number.
Choosing your priming sugar
Glucose (dextrose) is the workhorse: it ferments fast, completely, and flavour-neutral. For a standard ale around 2.4 volumes you're in the region of 6–8 grams per litre — but calculate it per batch, don't guess (more on that below).
Carbonation drops are the zero-math option: one drop per 33 cl bottle, two per 50 cl, done. We stock a 250 g bag (about 70 drops) and Mangrove Jack's 200 g. Slightly less control, zero chance of a measuring error at 11 pm on bottling day.
Brown candi sugar is the Belgian move — prime a dubbel or quad with it and you add a whisper of dark-caramel character along with the bubbles. Authentic down to the last gram.
One sugar that does NOT belong here: lactose. Brewing yeast can't ferment it at all — that's exactly why it works for sweetness and body in a milk stout, and exactly why it will never carbonate a bottle. Priming with lactose is a classic beginner mistake: you get sweet, flat beer. Use it in the kettle, not at bottling.
Pro tip: plain table sugar works too — use about 10% less than the glucose weight. But measure by weight, always. "A teaspoon per bottle" is how bottle bombs are born.
Do the math once — or never again
The exact sugar weight depends on your batch size, your target volumes, and the temperature the beer finished at (warmer beer holds less residual CO2). It's a five-minute calculation with a lookup table — or a five-second one: CraftBrew.io works out the priming addition per style and batch for you, alongside tracking the rest of your brew. We built it because we got tired of re-deriving the same spreadsheet every bottling day.
The process, start to finish
1. Confirm fermentation is actually done. Same gravity reading two to three days apart — that's the only proof. A hydrometer and a sample jar is all it takes; a RAPT Pill shows you the flat line without opening the fermenter. Bottling on a guess is the number one cause of overcarbonated beer. Never skip this.
2. Clean and sanitise everything. Every bottle, the bucket, the siphon, the caps. A FastWasher 24 rinses a full crate in one go, the FastRack drains them, and Star San handles the sanitising — no-rinse, so the foam in the bottle is fine.
3. Make the priming solution. Dissolve the full sugar weight in a cup or two of boiled water. Let it cool, pour it into the bottling bucket.
4. Rack the beer onto it — gently. An auto-siphon moves the beer quietly off the yeast cake and the swirl of racking mixes the sugar evenly through the batch. No splashing: every bit of oxygen you pick up now is hop aroma you lose later.
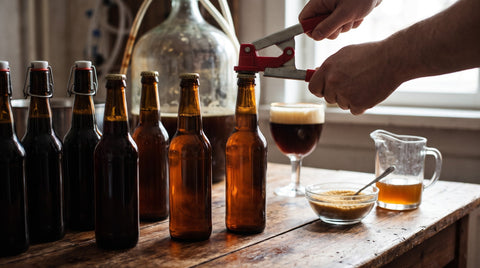
5. Fill and cap. Leave about 2.5 cm of headspace. For crown-cap bottles, use oxygen-scavenging caps — the liner absorbs the oxygen trapped in the headspace, and on a hoppy beer you taste the difference at week six. A twin-lever capper does the job; if you bottle every batch, treat yourself to the bench capper. Swing-top bottles just need fresh rubber seals — replace them yearly, they're the whole seal.
6. Wait. Two to three weeks at 18–22 °C, in the dark, standing upright — the yeast settles into one tidy layer instead of a ring around the bottle. Then move the bottles somewhere cold for at least a few days — cold beer holds its CO2 better, the yeast compacts into a firm layer, and the beer pours clear.
Bottles: what to fill
Standard carbonation levels are fine in any sound returnable-grade bottle: longneck 33 cl, Steinie, Vichy, or 50 cl longnecks for the bigger pour. Flip-top 50 cl and amber flip-top Steinies skip the capper entirely.
Everything bottle-shaped lives in one place — bottles, caps, cappers, seals and fillers — in our bottling collection.
Going Belgian — 3+ volumes — use heavy glass in perfect condition and never a bottle that ever wore a twist-off cap; that glass is thinner and the threads weaken it. When in doubt, bottle one PET bottle alongside the batch: squeeze it after a week and you can feel exactly how carbonation is coming along without opening anything.
Big beers need fresh legs
After a 9% quad or months of cold conditioning, the yeast left in your beer is tired — sometimes too tired to carbonate at all. The fix is a small dose of fresh conditioning yeast at bottling: LalBrew CBC-1 is bred for exactly this job — alcohol-tolerant, flavour-neutral, and it won't ferment the body out of your beer, only the priming sugar you gave it. It's how the Belgian classics get reliably carbonated at 10%.
And here's your calendar math: a dubbel bottled in the first half of November is carbonated, settled and drinking beautifully by Christmas. Just saying.
When it goes wrong
- Flat after three weeks? Usually too cold — move the bottles somewhere warmer and give it another week or two. Check your caps crimped fully, and on swing-tops check the seals.
- Gushers? Either bottled before fermentation finished, uneven sugar mixing, or an infection. If it's one bottle, bad luck; if it's the whole batch, revisit step 1 and your sanitation.
- Way overcarbonated? Get the bottles cold immediately — cold slows the yeast and keeps the pressure down — then open them over a sink, chilled, and recalculate next time instead of guessing.
Track it, don't scribble it
Bottle conditioning is where good notes pay off twice: the priming calculation going in, and the "when is it ready" question coming out. CraftBrew.io keeps both on your batch — target volumes, the exact sugar addition, conditioning start date — so the only thing left to remember is where you hid the bottles from yourself. Signing up through that link gets you started free.
What to buy first
| Priming sugar | Vinoferm glucose 1 kg — or carbonation drops for zero math |
| Caps | Oxygen-scavenging crown caps 26 mm |
| Capper | Twin-lever capper |
| Sanitiser | Star San 946 ml |
| Racking | Auto-siphon mini with tubing |
| Verification | Hydrometer, 3-scale |
Already kegging? You can still bottle-condition your Belgians and give the dry-hopped stuff the keg — the two methods aren't rivals, they're a toolkit.
Final Pour
Bottle conditioning rewards exactly two things: certainty that fermentation finished, and a sugar addition you calculated instead of guessed. Give it those and it hands you naturally carbonated beer with a mousse a tank can't fake — plus a cupboard full of Christmas presents that cost you a euro a bottle.
Questions about priming rates, bottle choice, or whether that quad is ready? Message us on WhatsApp or drop an email — we bottle our own beer too, and we answer fast.
More from the blog: Your First All-Grain Brew Day · Pressure Fermentation Explained · Kegging Your Homebrew

Comments (0)
There are no comments for this article. Be the first one to leave a message!